DIY stirrup makeover (when in doubt just add glitter)

I dunno about y’all, but if there’s one thing that can make this dumpster fire of a year have marginally fewer apocalyptic vibes, it’s definitely glitter. World burning down around you? Just focus on the shiny thing (and then, for the love of all that is holy, go VOTE)!

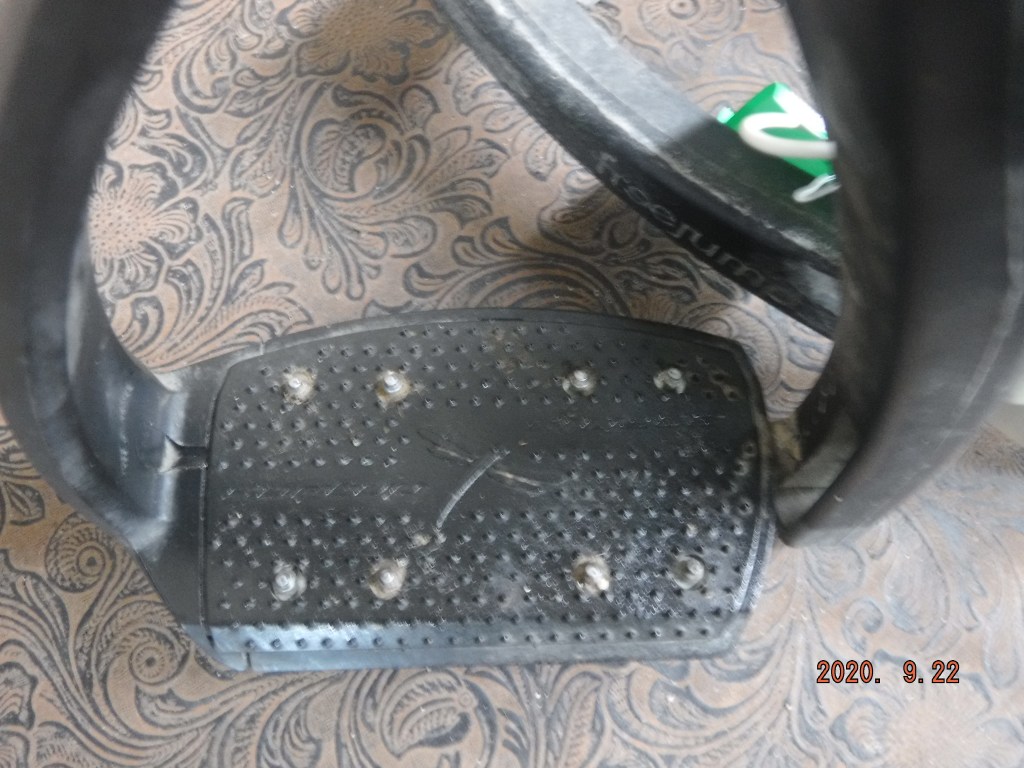
So anyway, like I said last week, I found another pair of FreeJump stirrups at a really random mostly western consignment shop in Arizona. They looked dirty and scuffed and sad but the price was definitely right, so I nabbed them. I was already 2000% tired of swapping stirrups back and forth between Henry and Presto’s jump saddles, it was starting to make me irrationally irritated by swap number 3.

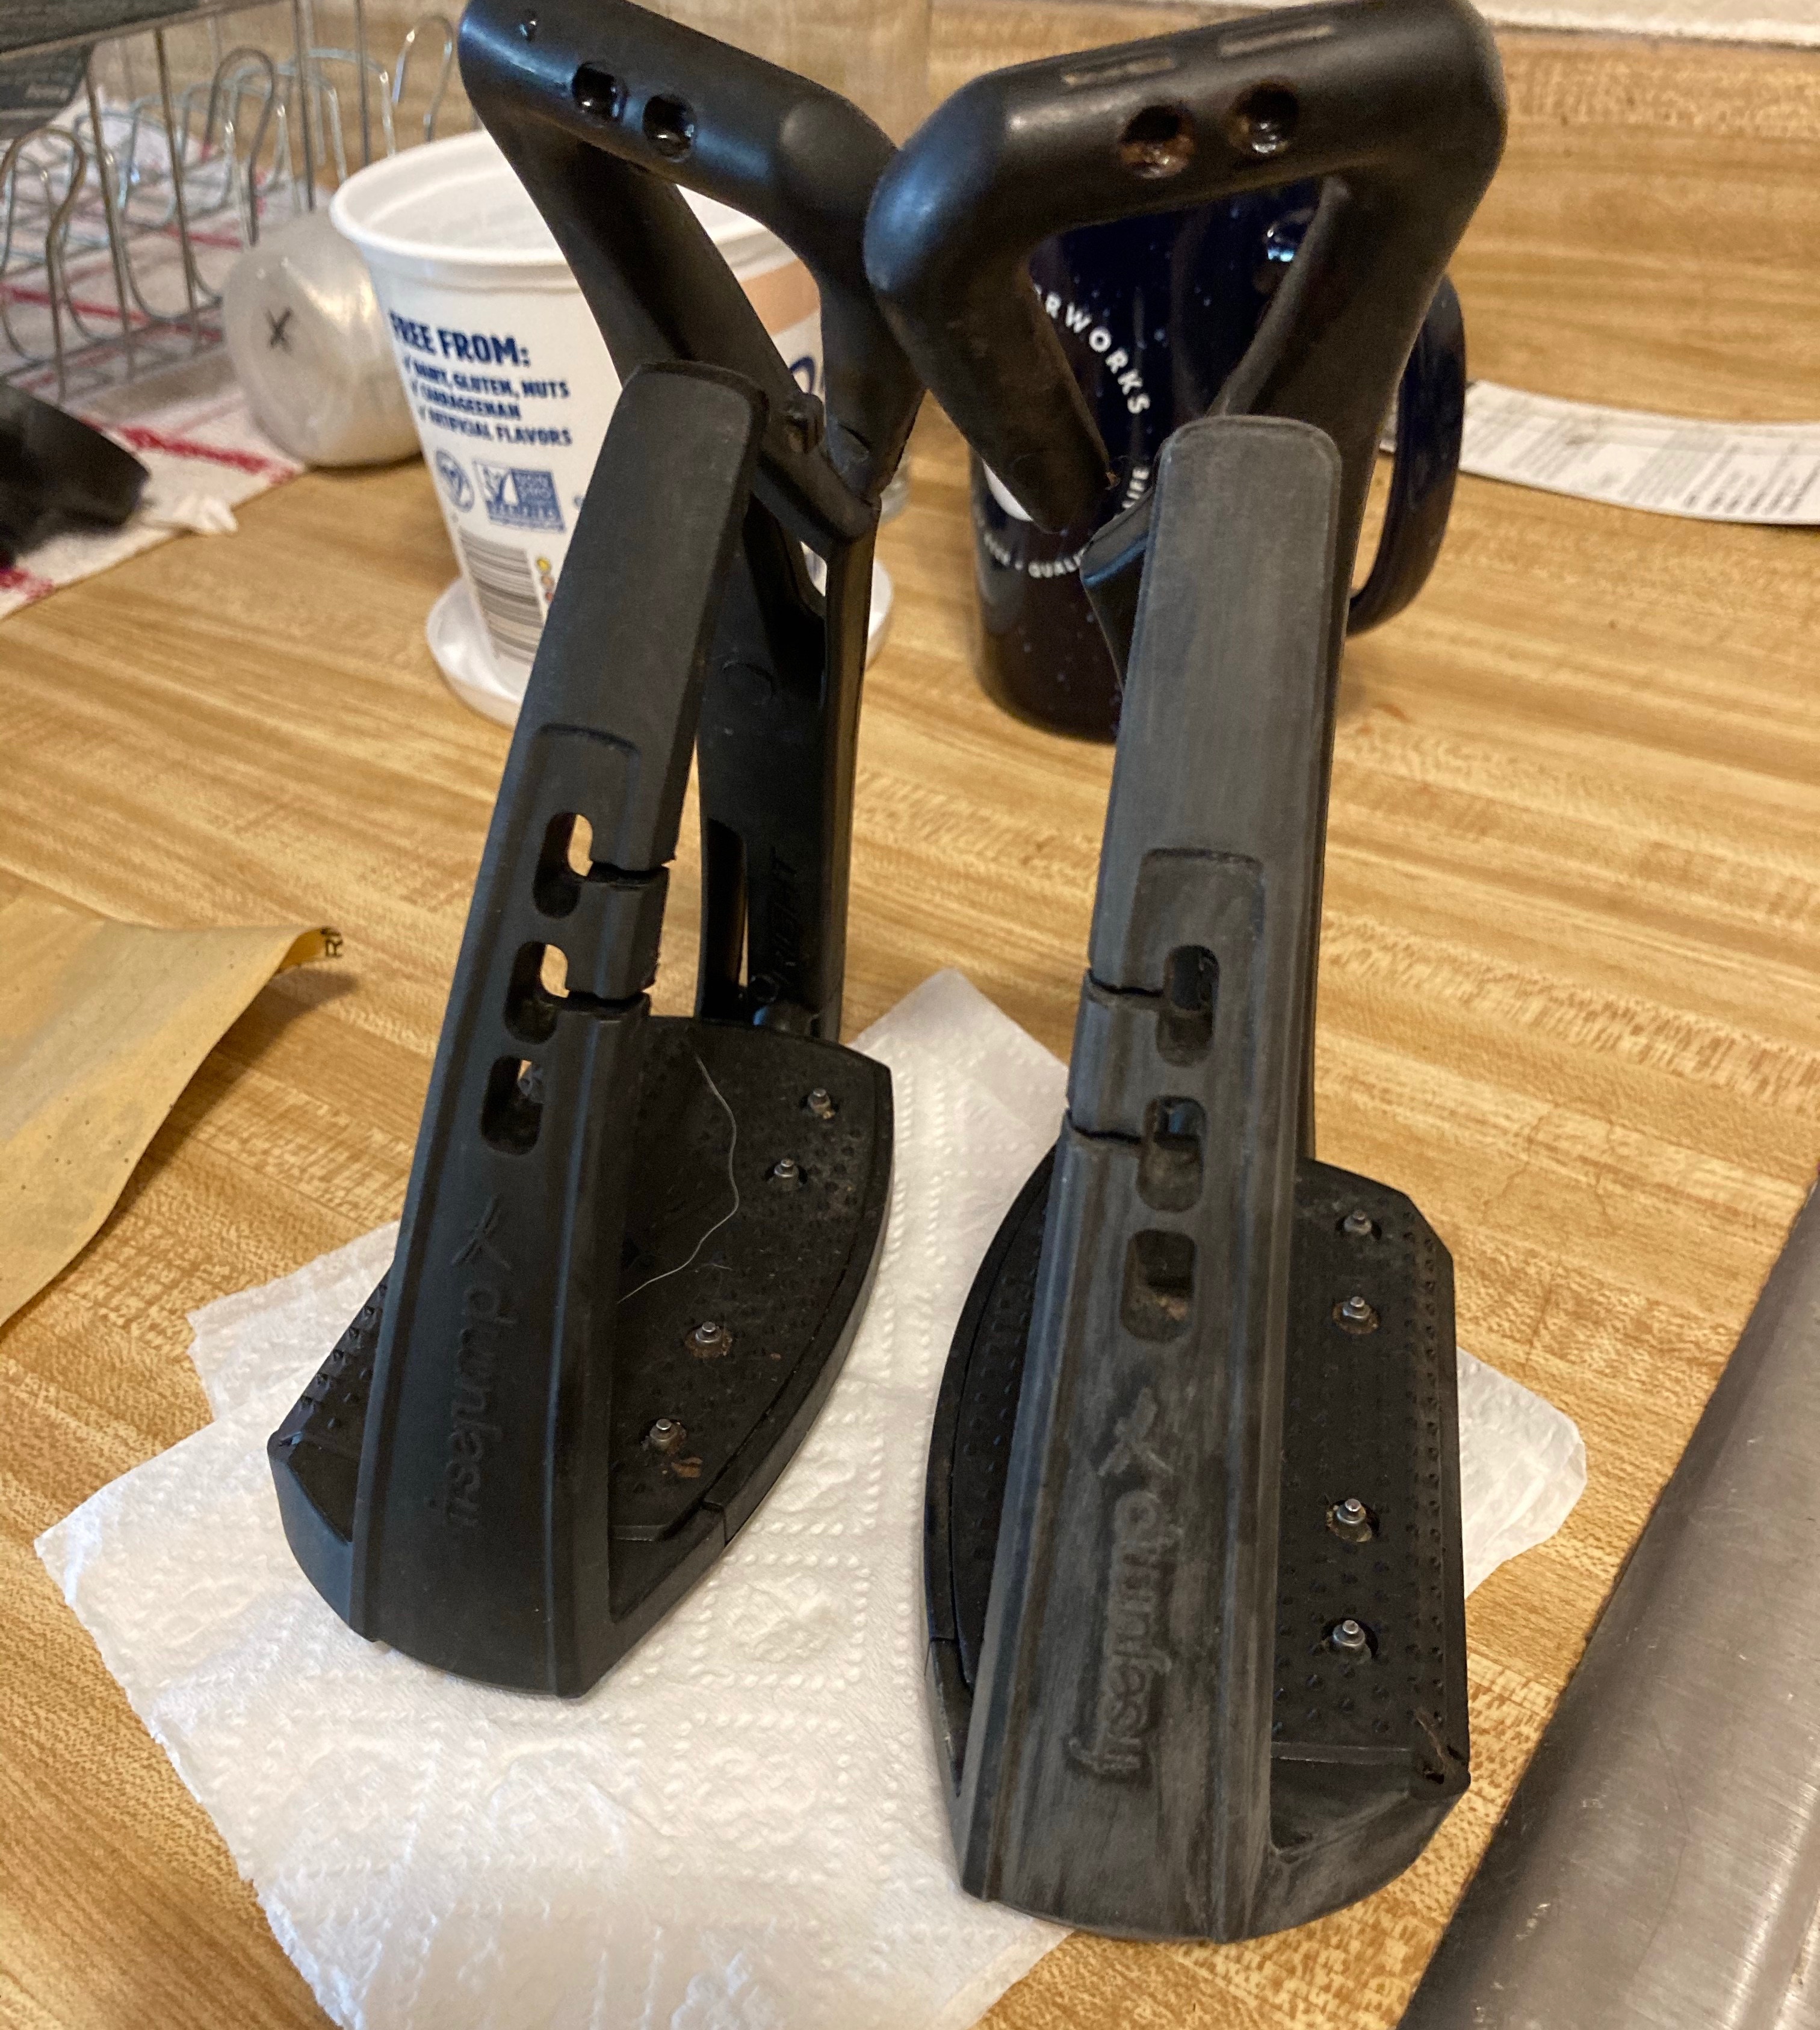
As you can see, they were just plain black. Not sure if y’all know literally anything about me, but I’m more of a navy fan. I did consider dark green, since Presto’s colors are navy and dark green, but I had a vision of navy glitter and once it got in my head I just couldn’t turn away from it. Sparkly navy stirrups. Um, yas please.

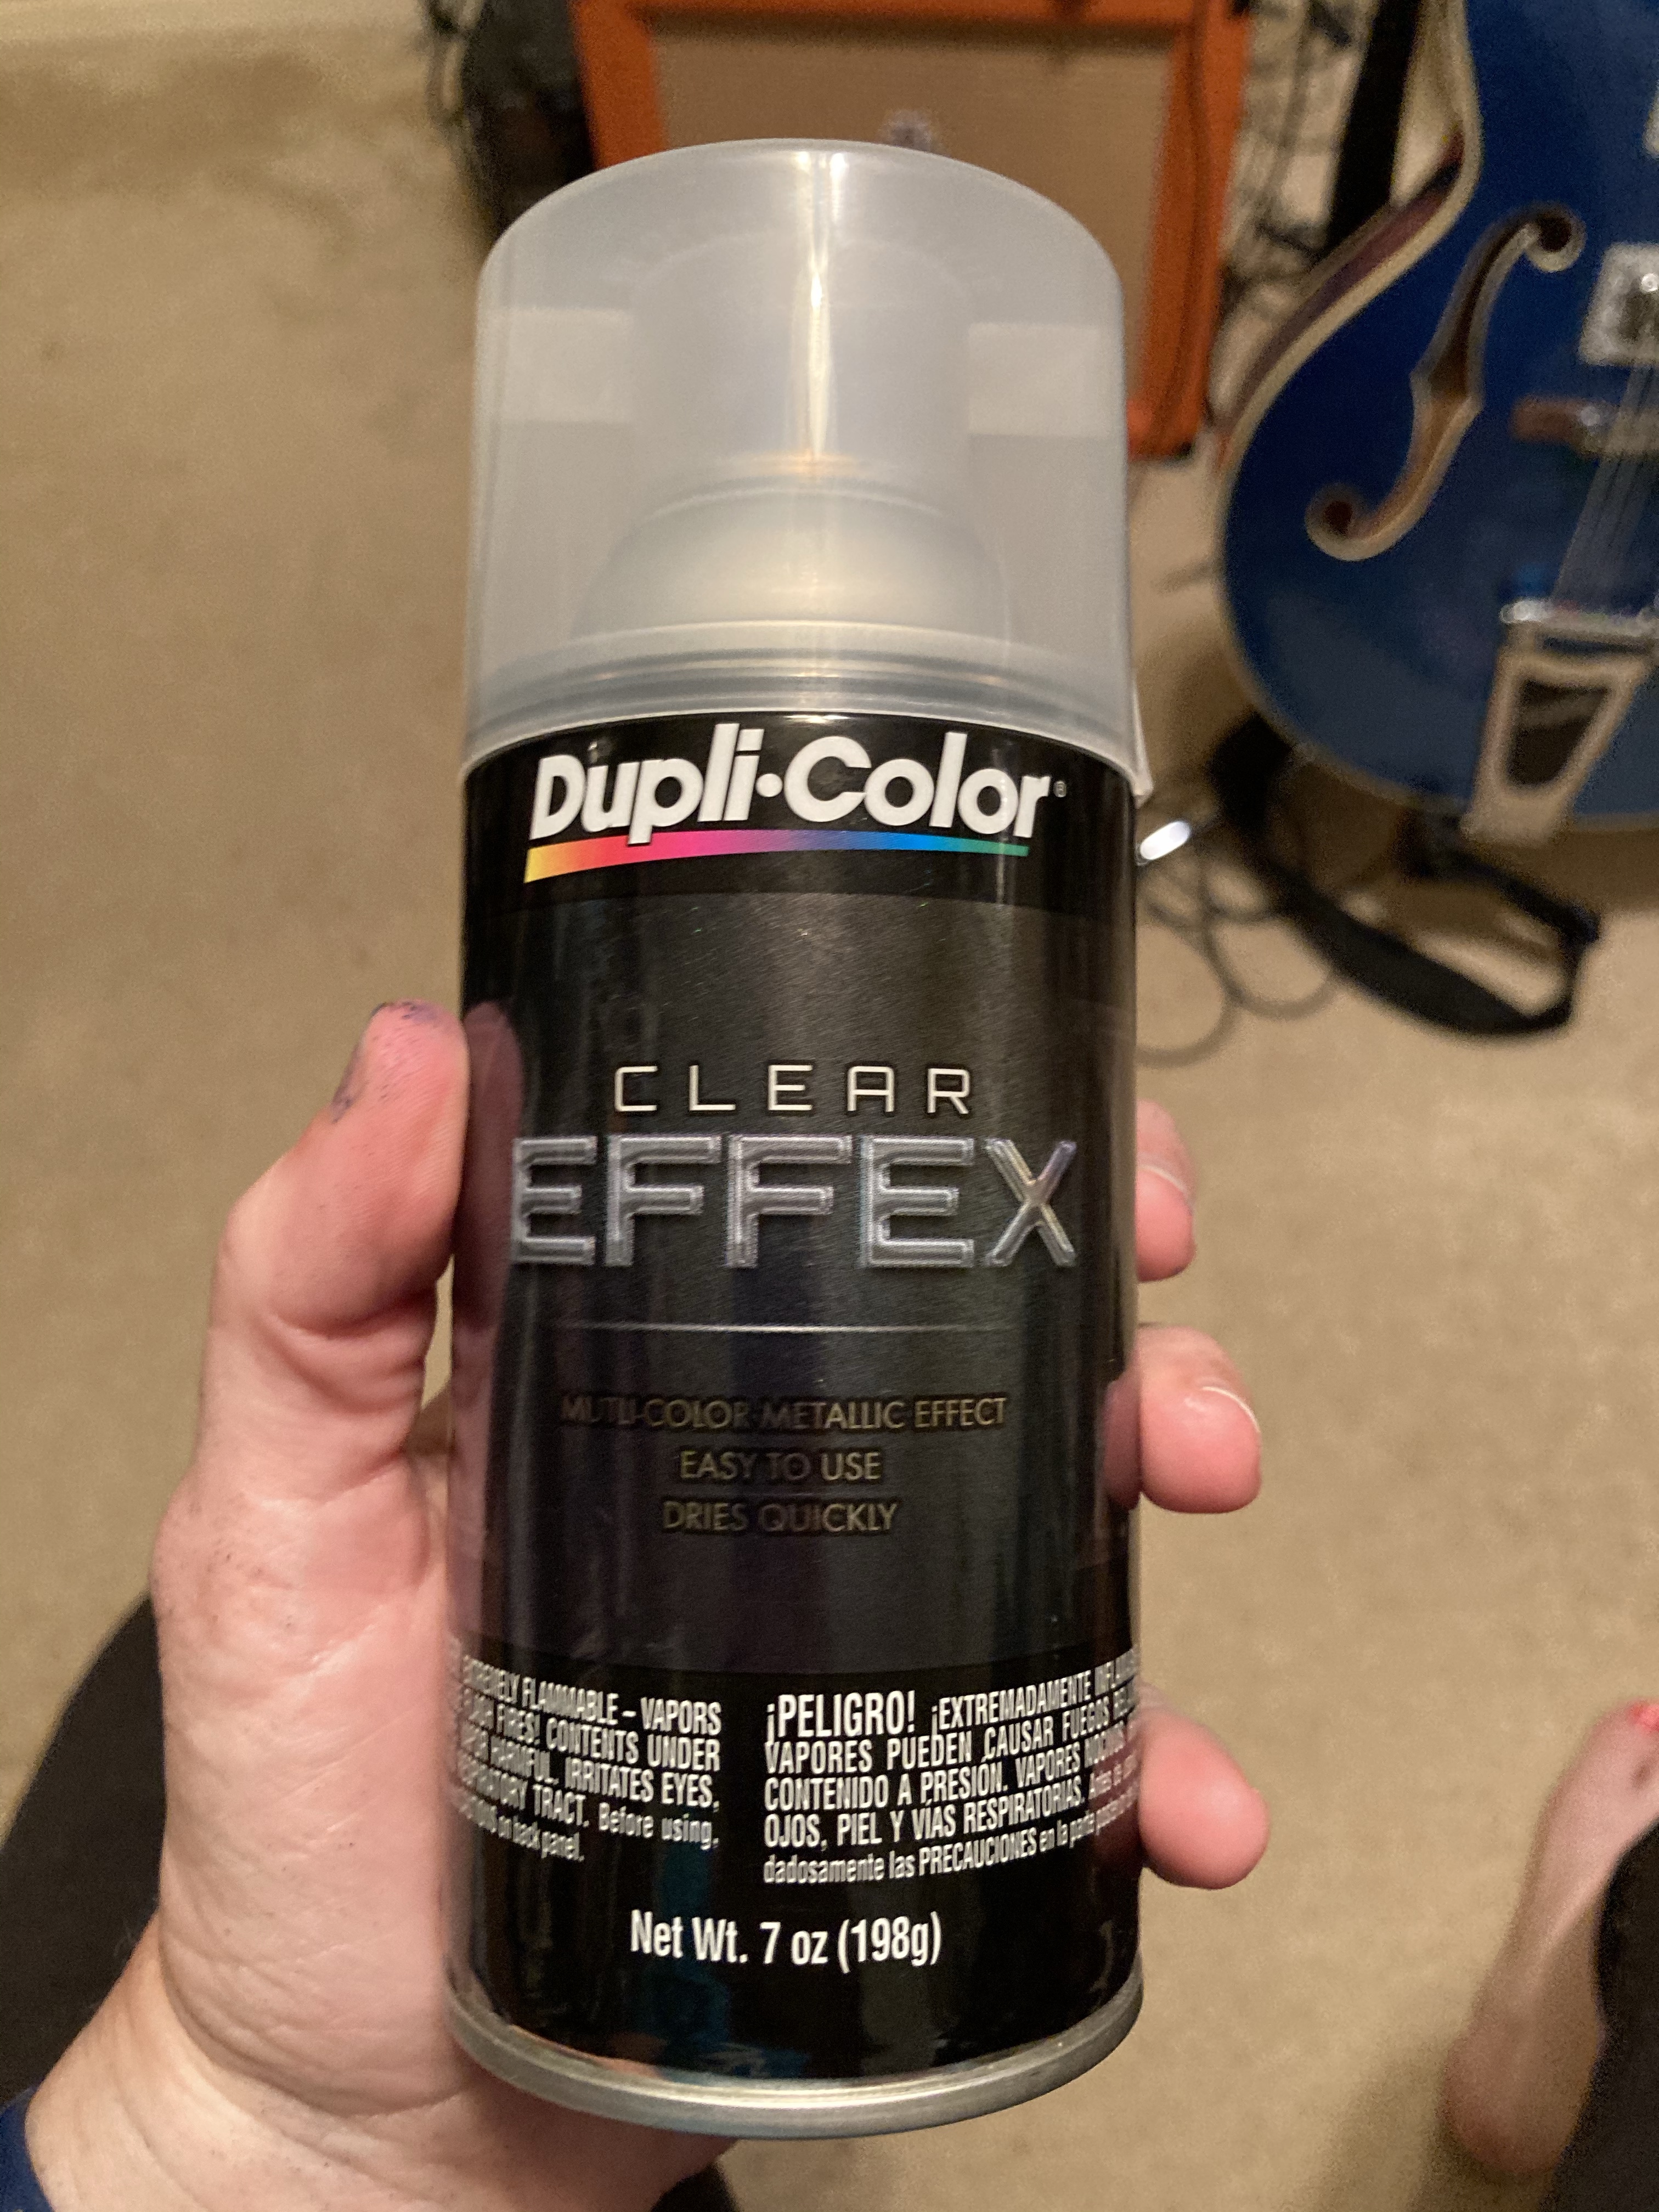
This is not my first rodeo with painting things, so I followed the same process I’ve done before with plastics. I already had all the items I needed except for the navy paint, so I invested about $3.50 into this particular project, but in total I used: super fine grit sandpaper, rubbing alcohol, spray paint (I used Rust-Oleum 2X Painter’s Touch, which is primer and paint in one. If you wanted to be super diligent you could get a separate primer and paint.), a glitter clear coat, plastic bags, and tape.

The glitter of choice. It’s mostly used for car stuff but the SO also uses it to clear coat his plastic rockets with great success so I figured I’d give it a whirl.

The first and perhaps most important step: clean and sand the surface. This will make a big difference in how well the paint adheres. You want to lightly scuff up the surface as well as remove any top coats that may have been applied during manufacturing that will interfere with adhesion. I cleaned both stirrups first with dish soap and a scrub brush, then sanded the part I was going to paint, then wiped it down with rubbing alcohol to make sure it was as clean and residue-free as possible.

one sanded and cleaned, one just sanded

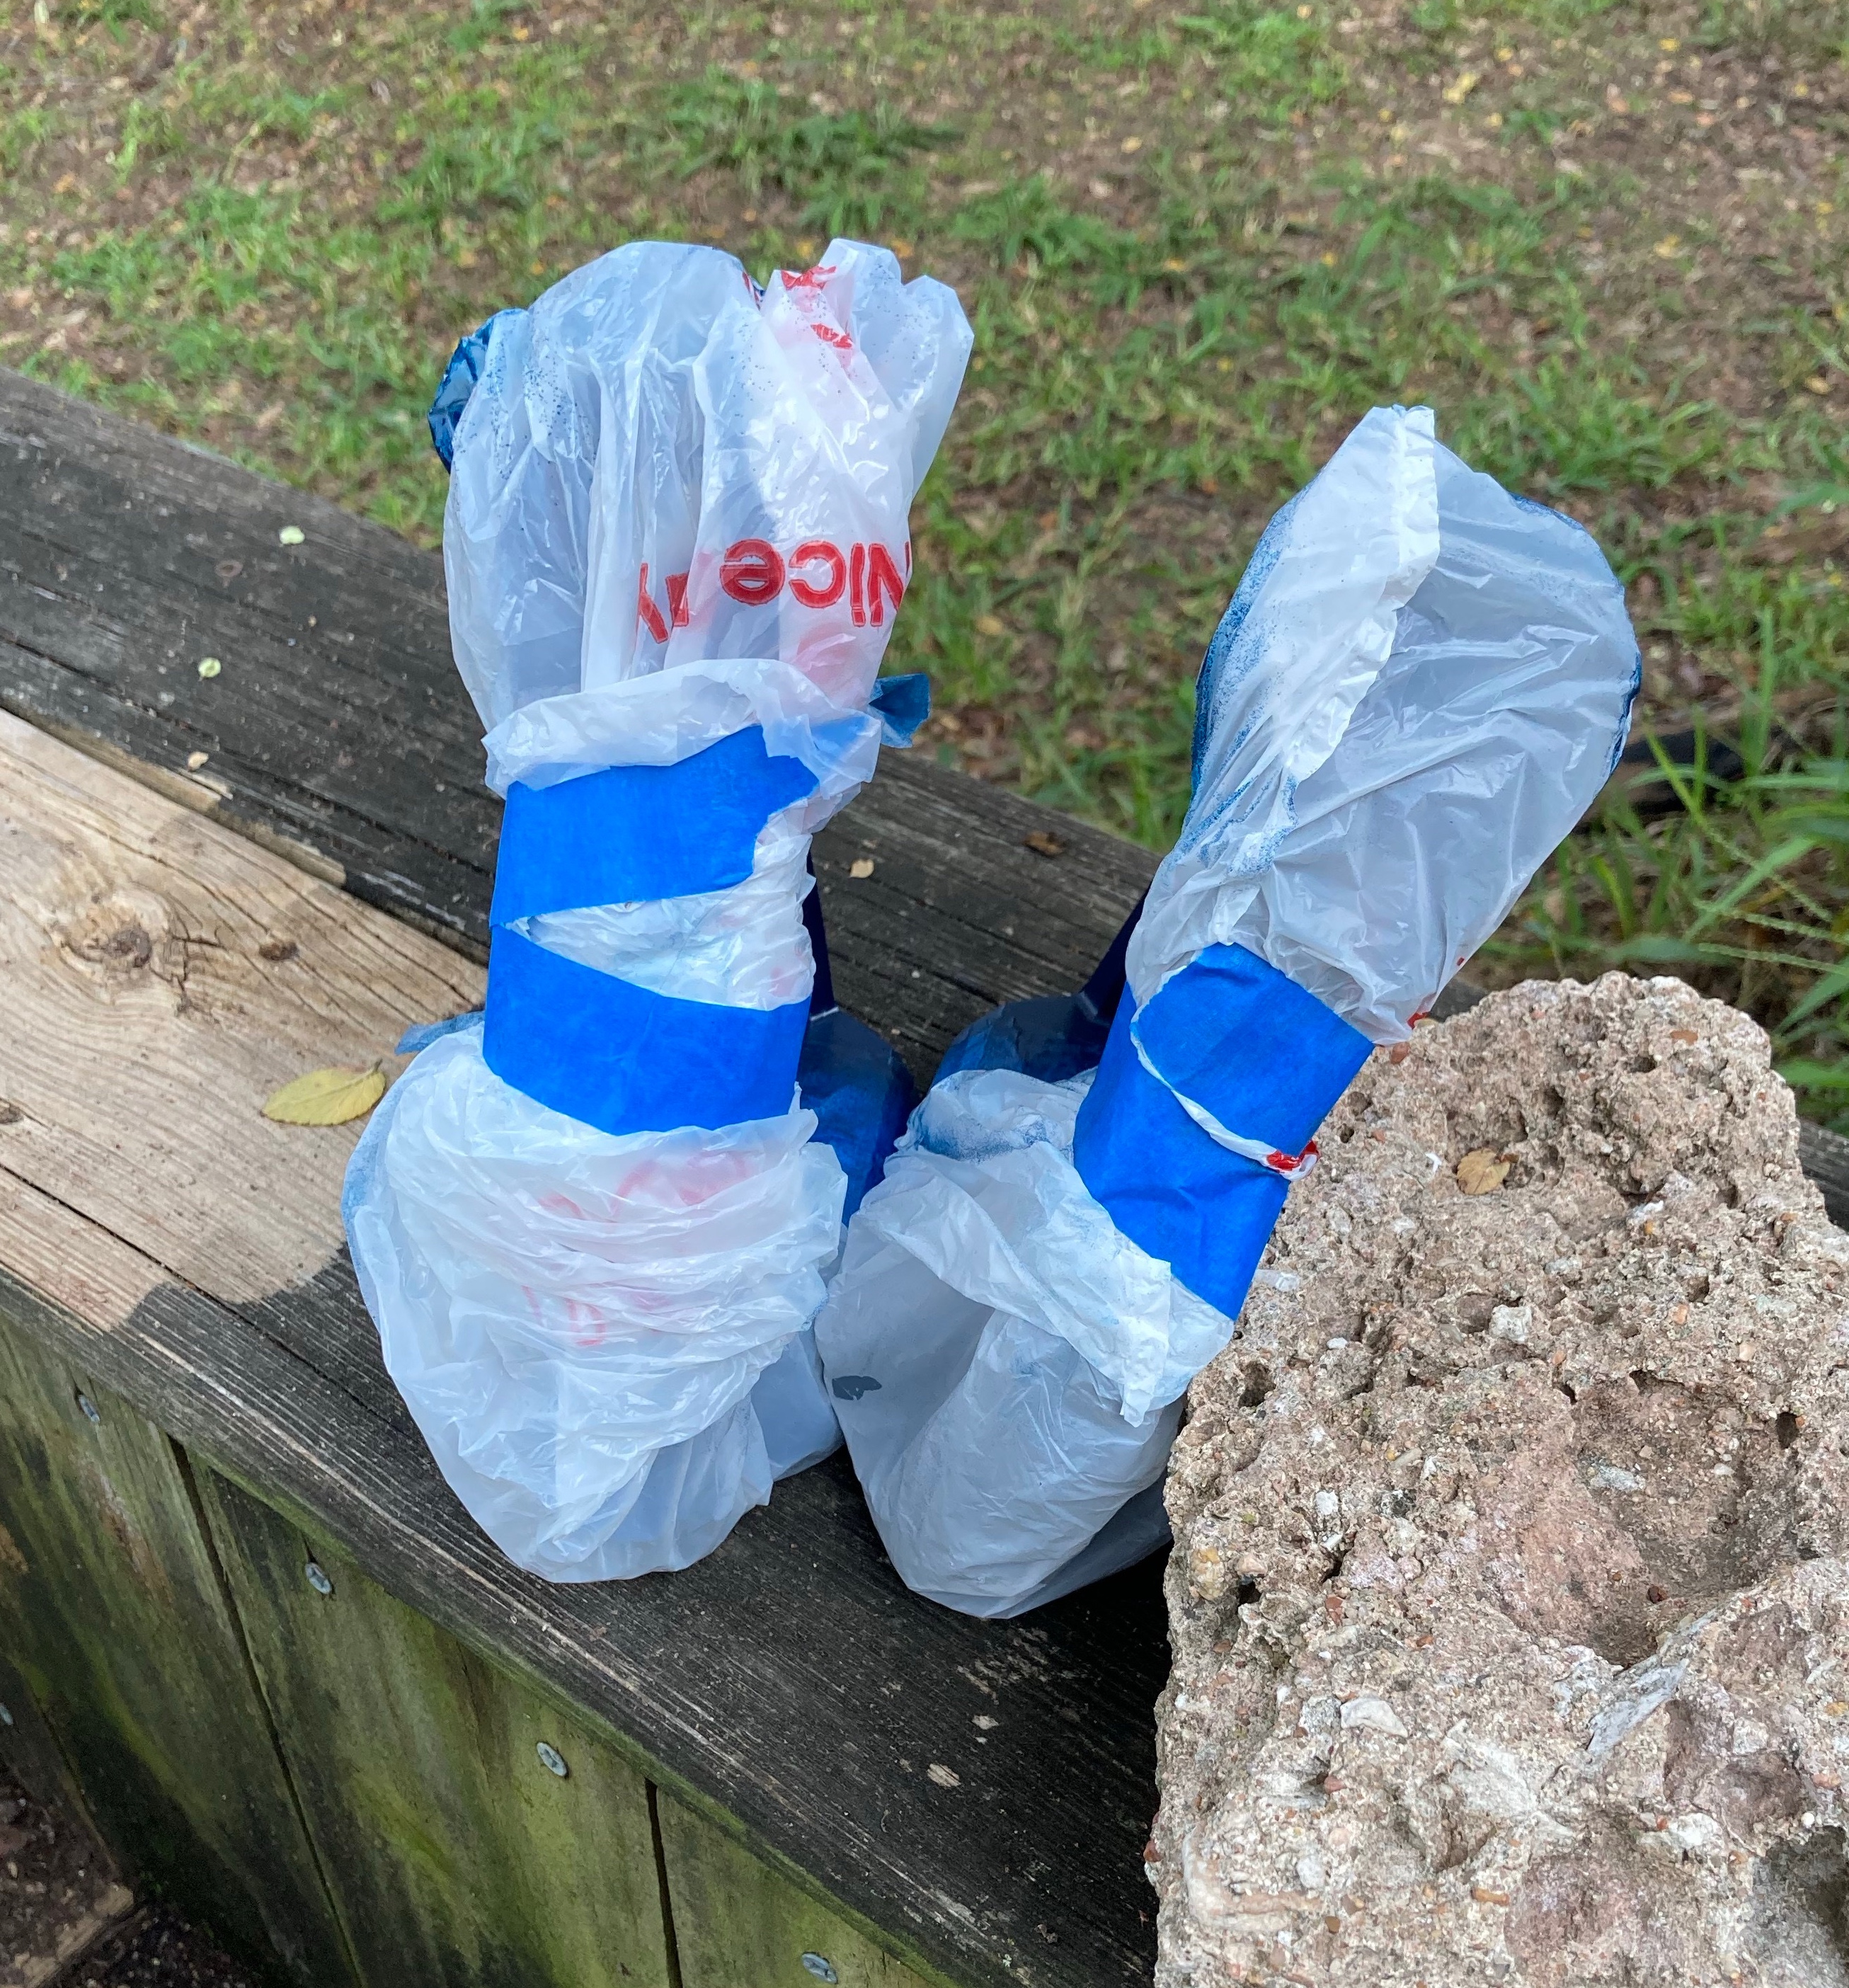
I decided to paint just the outside branch of mine, like FreeJump does with all of their colored irons. 1) It was less to paint, 2) it looked more “true” to the brand to follow what they do. 3) I think it will make the paint job more durable, since it’s not coming into contact with dirt/sweat from the horse or having a stirrup leather running over it all the time. That meant I had to cover the areas that were going to stay unpainted. I opted to use leftover plastic grocery bags with blue painters tape around the edges, to make sure I got clean lines.

Next step: paint! I experimented with the navy paint on a box first, so I could get a feel for the sprayer and how fast/heavy the paint came out. To prevent chipping and lifting, it’s really important to get the paint coats light and even, with no bubbles or excess paint. Both of those mistakes are especially easy to make when doing small items like these. That paint in particular also comes out pretty fast with good coverage, so I was glad I experimented with it first. Once I got the feel for the spray, I did the first coat on each stirrup.

Navy!

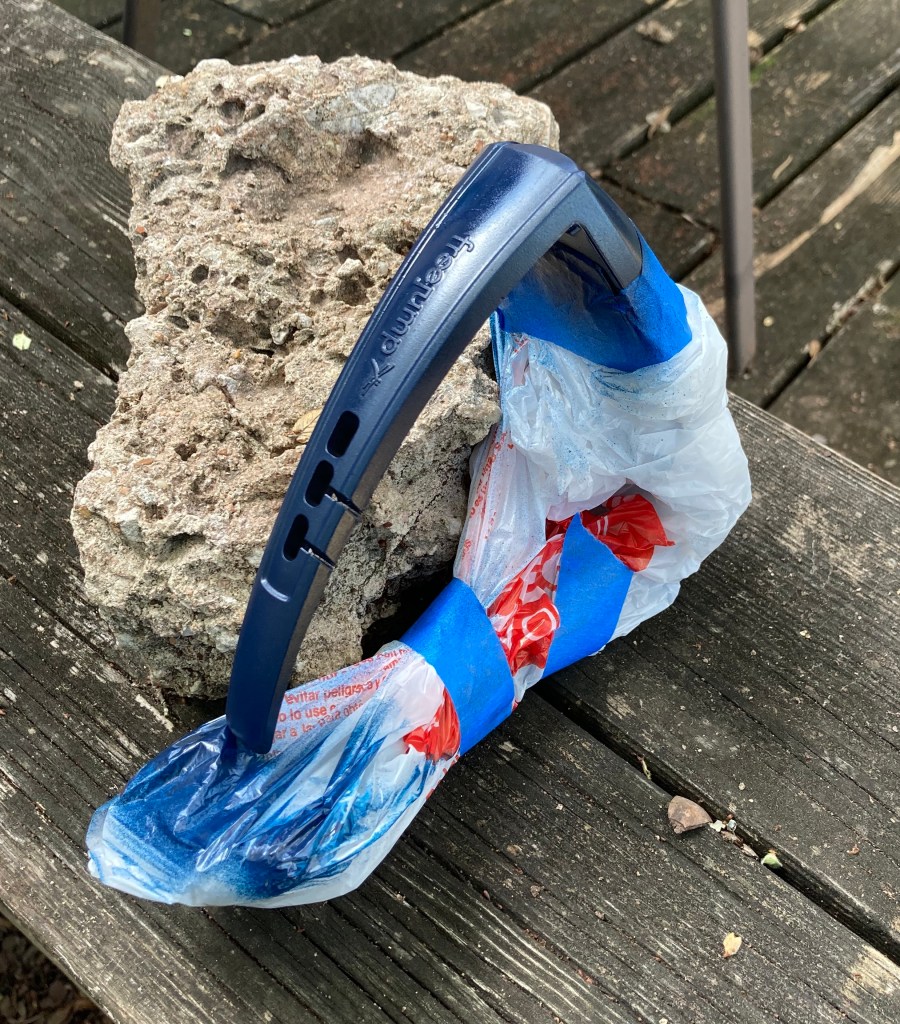
The shape of the area I had to paint made it a little tricky to get it all even, so I ended up just holding it in one hand so I could move it around and turn it while I sprayed with the other hand (a glove would be useful there… I got a blue thumb). I ended up only doing two light coats of the navy, since it did cover so well. I didn’t see a need to do anymore. Follow the instructions on the back of your paint can to see how long you should wait between coats. I should also mention that I did this on the most ideal type of day for painting – it was about 80 degrees with under 50% humidity, and I stayed in the shade. Your paint can will probably mention guidelines like that too. Read the can.

Once the color coats were dry, it was time for the clear glitter coat. Aka the fun part. The glitter I had was multi-color, kind of iridescent or holographic looking, but you can buy pretty much any color glitter you want. Originally I had pictured just plain silver, but this is what I had and it looked super pretty on SO’s projects, so I figured I’d give it a whirl. Worst case scenario I could always remove all the paint and start again or just revert back to the original black if it all went sideways… it’s not the end of the world.

On goes the glitter

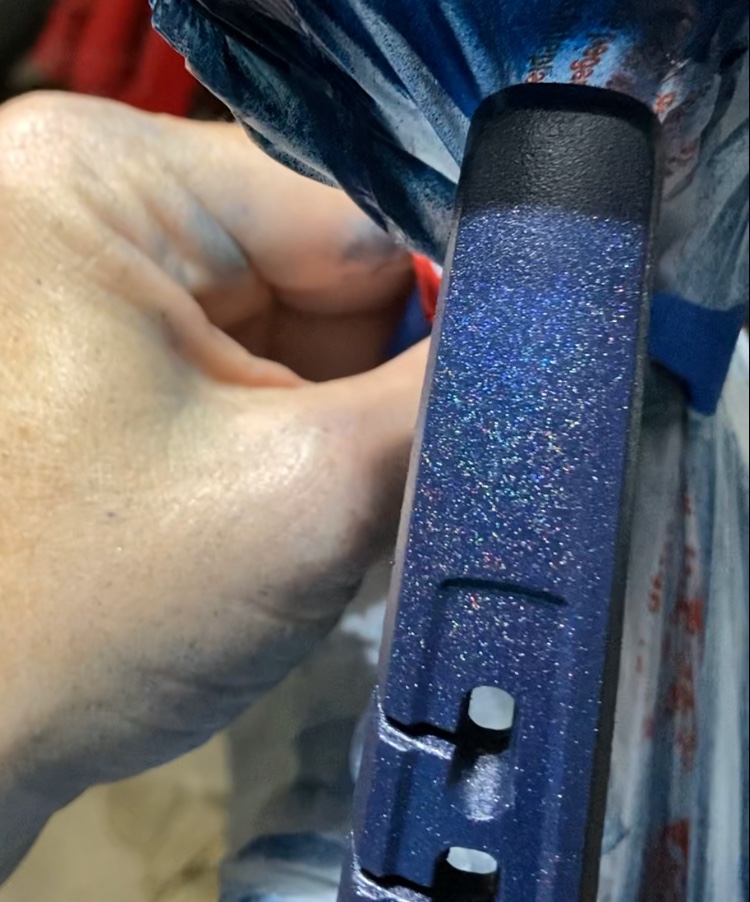
I ended up doing 3 very light coats of the glitter, for maximum shine. I was impressed with how smoothly it went on compared to other glitter brands I’ve tried in the past (where it inevitably gets clogged and/or no glitter really comes out). The glitter is very fine, which helps I think. When I first applied it I was in the shade so it was hard to tell just how much the glitter was showing up. My advice would be to walk out into the sunlight and take a look after each coat. You could also finish with another plain clear coat or a gloss coat if you wanted to, but I left it at the glitter clear coats.

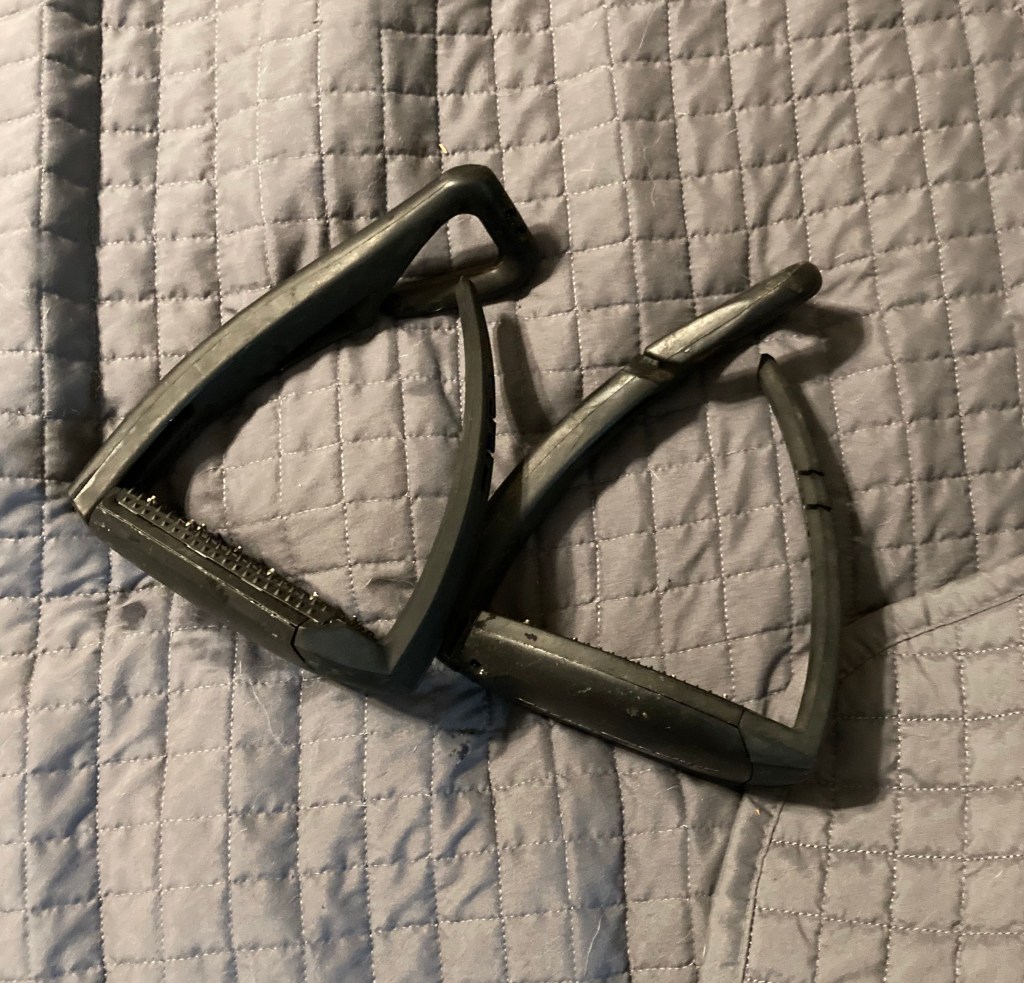
So how did they turn out?

Y’all.

Y’ALL.

I’m obsessed.

No more sad boring stirrups!

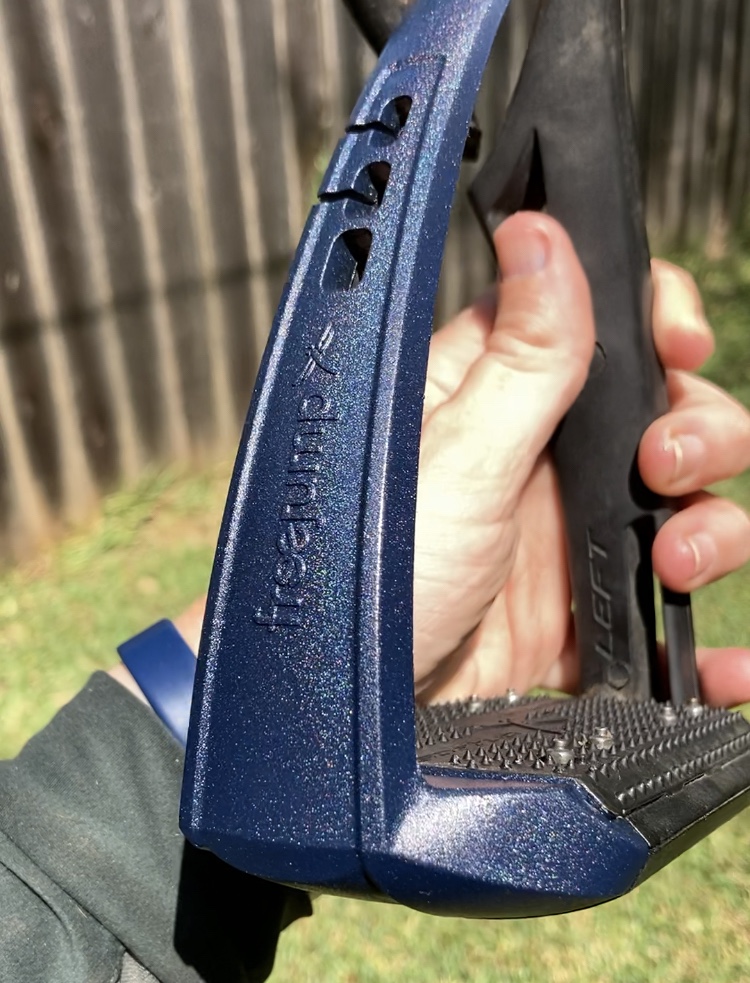
In the sun you can really see the nice slightly holographic look of the glitter. It’s not so much that you can see it from very far away, and it’s not so sparkly that anyone is going to be blinded by it, but it’s there. You have to be up fairly close to really notice it. As far as glitter goes, it’s pretty subtle. I prefer that, personally, since it’s not quite so garish or HELLO I HAVE GLITTER STIRRUPS. I can show in these with no qualms at all and I don’t feel like they look like childish or overdone.

In the shade they mostly just have a really pretty metallic sheen to them, which I really like as well.

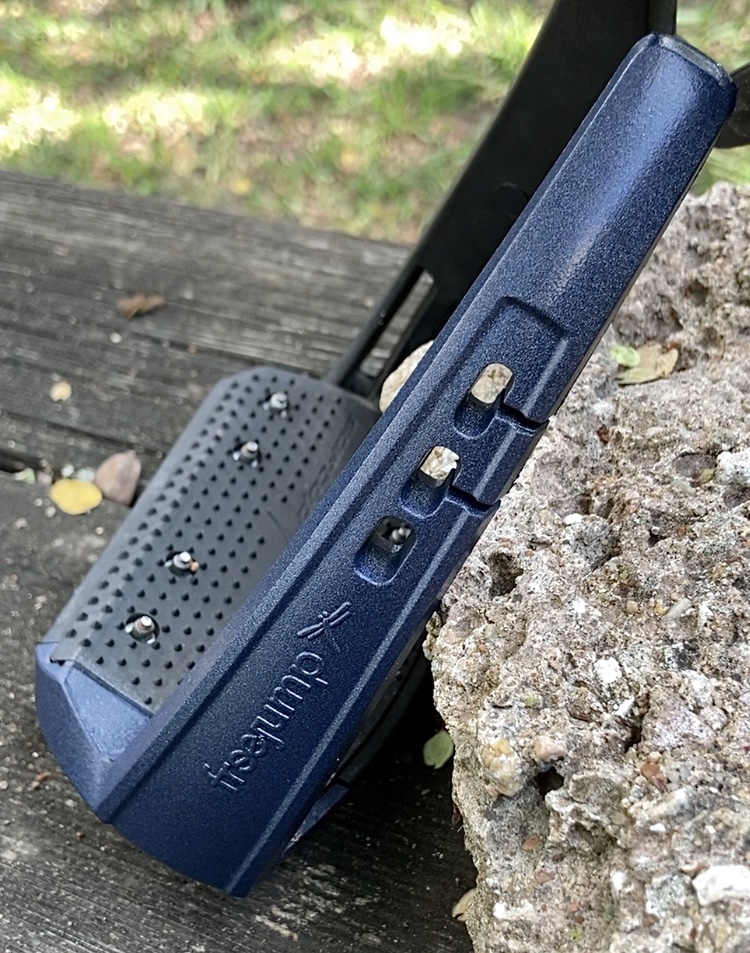
So far I’m super pleased with how they came out. I’m giving them this week to completely cure before I use them, but then we’ll see how they hold up to barn life. I did drop one on the hardwood floor the other day and you can’t even tell that it took a hit, so I’m hopeful that it will at least be relatively durable. Like I said, very worst case scenario I can re-do it or just remove the paint and go back to the original black. Honestly though, I like these so much that I kind of want to do my other FreeJumps to match. FJ’s standard navy color is pretty bright, more like a royal, and I much prefer this darker navy. Plus, uh, the glitter.

MRW this sub needs more people, posts and glitter! : trollbi

Overall this was a cheap easy project that cost me less than $5, took about an hour, and has already brought me a lot of joy. What more could you want?

Tiny Home Tuesday: Panic Attacks and Turd Burners

I’ve had this little knot of anxiety sitting in my stomach since we purchased the tiny house. Not because I regret it, quite the opposite actually, but just because there’s a lot that needs to happen before all of this is done and dusted (and by “dusted” I mean – all humans/animals fully moved into tiny house and house in the city is successfully rented out to someone else). I’m one of those people that might take forever to make a decision, but once I make it, that’s it. I want it done THEN. Having to wait just gives me more time to overthink and stress and worry. I’ve spent a lot of time lying awake at 3am running through everything on an endless loop in my head. It’s who I am as a person.

I Am Rihanna GIFs - Get the best GIF on GIPHY

Part of it is that I know not everything will go to plan. Nothing ever does, especially when you’re building a house, and an unconventional one at that. There are a lot of weird little things to consider. Plus there’s the added challenge of going from 1800sqft to 400sqft, that’s a big lifestyle change. And the whole “get the current house ready to rent” thing, which entails mostly cosmetic things but still a decent amount of work. It’s a lot to pack into one anxiety knot.

A lot of progress has been made since the last time I talked about all this though. Like… we have an estimated completion date for the house (2 weeks!). The site is also just about ready; the water line has been run, the electric has been run, the fence is up, the gates are in, etc… now it’s just the driveway left, which is happening today.

Digging fence post holes

The only thing left to really iron out was the toilet situation. I had originally touched base with a guy a couple months ago about what I had in mind, and at that time he was like “yeah sure no problem, call me back when you have a delivery date”. So I called him back last week, at which point he was like oh no I can’t do that, here’s XYZ reasons why that’s a bad idea and also not actually to code and no I definitely can’t help you and your cost would be astronomical for all these reasons. Cue panic. He had a lot of good points I hadn’t thought about, but it was all information that would have been useful MONTHS AGO. What I thought was the plan was now actually no longer a viable plan at all. That little knot of anxiety became a full blown panic attack as I quickly backtracked and reconsidered.

Really there were only a few viable toilet options, the best of which included ditching a traditional toilet altogether. There are a LOT of toilet options out there, y’all. I think I’ve extensively googled pretty much all of them by now. There were only 2 that I thought sounded particularly workable for us though: 1) a urine-diverting compost toilet, or 2) an incinerating toilet.

Details & Dimensions - Air Head Composting Toilet | For Boats, RVs & Cabins

Of everything I ever thought I’d know a lot about, I certainly didn’t picture unconventional toilets being one of them. Yet here we are…

Anyway, I spent an embarrassingly long amount of time digging into all of these options. I had a pages-long document with the details and pros/cons of both types, with subsections on specific brands within those types and THEIR details and pros/cons. I read all their user manuals cover to cover, watched a bajillion youtube videos on everything from installation to repairs to reviews, asked tons of questions in all my tiny home groups, and read a lot of blogs. Once again I find myself asking wtf we even did before the internet existed. Anyway, I’ll spare you the deep dive but the basics were these:

Composting Toilet: cheaper, super green, but more upkeep and a bit more “mess”. Basically the urine gets diverted to a container in the front (that has to be emptied every couple days) and the solids go into the compost bin in the bottom, which also has peat moss in it. There’s a fan running through it (routed to the outside) 24/7 to keep the compost dry and make sure it’s odor-free inside your home. You stir the compost bin a few times a day with the little handle on the outside, and very few weeks you empty the compost bin and refill with new peat moss.

Incinerating Toilet: almost 2x as expensive, also super green, uses more electricity (about $18/mo based on average of 6 cycles per day and our current price per kWh, yes this is the level of deep dive that I went to), very sanitary (if you use it right, anyway), very low upkeep, and closer to a “normal” toilet experience. Also definitely more of an appliance than anything else, because this one quite literally incinerates all the waste. They use these things in Antarctica to reduce the environmental impact of humans. Basically you put a big wax-paper type liner (which the company sells of course, but they’re not particularly expensive) in the bowl before you go, then when you’re done you hit the foot pedal to open the bowl and the “package” drops down into the burn bin below. You hit the start button on the back of the toilet, the fan and heating elements come on, and the thing literally burns all the waste into a little pile of ash. There’s a vent out the back of the unit through the wall to the outside to divert the smell, and all you have to do is pull out the ash pan out of the bottom and empty it every week or so (with 2 people’s worth of average use).

In the end, we went with the incinerating toilet.

It’s like THE thing on Instagram for people to crack it open during the burn cycle (which you definitely aren’t supposed to do for safety’s sake) and take a picture of their flaming poo

SO was more comfortable with this option since it’s lower day-to-day maintenance and at least a little bit closer to a normal toilet experience. I was fine with either one (I’m a horse person, a little poo compost really doesn’t bother me) but honestly I kinda leaned toward the Turd Burner too. Emptying an ash pan is definitely easier than emptying a pee jug and a compost bin and it just FEELS cleaner to have it all reduced to a teeny pile of sterile ash.

And so that, my friends, is how I found myself online ordering a $2,000 poo burning toilet on a Friday night. I can honestly say I never had that one on any of my bingo cards. I’m kinda looking forward to this thing though. What is life without adventures? And hey, if nothing else it’ll be a real hit at parties and get-togethers. How many people have actual SHIT INCINERATORS in their house? Between that and the Cat Shit Robot we’re gonna get some kind of reputation.

poop - GIF on Imgur

Anyway, the only caveat with the Turd Burner is that it does require it’s own designated 20a outlet to run, so after stressing a lot about the wiring and our electricity, I called our builder to see if it I could just request an add-on. Luckily it was still doable, so after a few phone calls, more paperwork, and a check for $51, there will now be a special outlet in the bathroom just for the toilet, and it’s on it’s own breaker. All we have to do when it comes is cut a hole for the vent, plop the toilet down, connect it, and plug it in. The knot in my stomach has loosened at least a little.

Naturally, though, covid is also affecting supply chains when it comes to parts for poop receptacles, so there’s a 6 week lead time on the Turd Burner (um, I guess I should say it’s actually called an Incinolet but I just feel like Turd Burner has a better ring to it). That means I might be using a camp toilet and/or the toilet in the main house for a couple weeks, but not a big deal. Worse things have happened.

Please Don't Summon Demons in the Bathroom Cross Stitch image 0
Who’s good at cross stitch and wants to make me this from a pattern on Etsy? I need it to go with my Portal-To-Hell toilet.

I will feel a lot better when the house is actually HERE and in it’s spot and everything is hooked up and working. Then the only loose end I’ll really have left (at least in regards to the tiny house prep side of things) is getting the skirting put on. I’ve called around trying to get a few estimates (because while we can do it ourselves, I’m not sure either of us particularly wants to) with no luck so far. I think I’m gonna try the handyman route next and see if I have more luck that way. It’s not a particularly hard job, it’s just tedious as hell. The skirting isn’t quite as urgent as everything else, though.

Always doing my part to keep your blog feed as weird as possible, y’all.

We put the fun in InFUNdibular Restoration

Henry continues to be the horse that teaches me the most in pretty much every regard. Sometimes it’s about good things, like cross country. Other times it’s about all the super rando things you’ve never even heard of in your life that you can spend money on in pursuit of keeping them happy and healthy. Friday was the latter.

Earlier this month Henry and Presto had a routine dental appointment, during which we discovered another potential problem tooth. Last year he had to have a broken one removed (which was very not fun) and he had another one that was inevitably trending the same way. The dentist recommend that I bring him into the clinic for what was essentially described as a “filling”, to prevent the tooth from actually breaking. The earliest I could get an appointment was mid-October, but last Thursday they called and said they’d had some cancellations, did I want to bring him in on Friday instead? Heck yes. Let’s get this over with.

Very offended when he realized I unloaded him at a vet clinic and not at a fun jompies place

The real name for the procedure is infundibular restoration, and I’ll be honest it was pretty fun to watch. Mostly because it was quick and relatively straightforward with zero gore, which automatically makes it much easier than basically any other dental-related stuff. The toughest part about it was the sedation, really. Henry is a mega-lightweight; a super cheap date. He was snoozing pretty fast.

Pathetic

Then the tooth cleaning began. Just a quick recap of the actual issue if you don’t want to go back and read: Henry is in the relative minority of horses that have irregular or missing cementum in some of their teeth. Cementum is the stuff inside the inner pillars (infundibulum) of the tooth that give the structure it’s strength and keep it stable. In horses that have these irregularities with their cementum, as they age and the tooth erupts further and further up into the mouth and is worn down, these gaps eventually work their way to the surface of the tooth. The missing cementum makes the tooth more fragile and more prone to breaking and/or infection. Which… is obviously bad. Henry’s broken tooth from last year was due to this same issue, and I would prefer to never have to put any of us through that again if we can at all avoid it. The gap in this particular tooth was quite large and the vet gave it a 90% chance of breaking within the next year or two. The recommended treatment to prevent this: infundibular restoration (aka a “filling”).

Using the endoscope and what was essentially a big fancy water pick, the vet began by flushish all the packed material out of the tooth hole. There was a good bit of old food packed down in there, so it was mega stanky, but eventually he was able to get it all out. After that it was as simple as filling the hole with the dental composite. He would put a little bit in, set it with the curing light, put a little more in, set it with the curing light, on and on until the hole was filled. Very very similar to a human filling.

So fresh and so filled, filled.

Granted, it was a pretty big hole, but still, setting up the equipment and cleaning out the hole took longer than actually filling it. The end product is a much stronger, nicely-filled tooth that should hopefully last indefinitely. The success rate for this procedure is quite high, so fingers crossed that this works for Henry too. It’s definitely much cheaper, easier, less invasive, and less problematic than having to pull a broken tooth. Once he woke up from the sedation that was the end of it – no particular aftercare. He was free to eat normally and be ridden normally.

As of now all looks good. By the time we got home from the vet he was fully returned to normal and went right back out to his pasture. Henry will be on a 6 month dental rotation for likely the rest of his life, in an effort to keep ahead of these issues with his cementum and try to prevent any further broken teeth. Apparently our equine dentist is one of only a few in the country that offers infundibular restoration at all, so it’s pretty fortunate that we have him available to us given Henry’s particular issues.

In 21 years of owning horses I had never heard of or seen this particular procedure before, but it was pretty neat… always something new to learn with horses though, right?

Foal Friday: Played like a fiddle

It should be no surprise to see who is the center of attention yet again this week. There’s just no telling a story around here without a certain little pony being right smack dab in the middle of it. And poor kid, ya know, not his fault he’s the star of the show, he’s just out here (very innocently, I’m sure) trying to do Pony things.

Like… open the door to the pump house so he can pull some more insulation out.

He can definitely get this door open, if you give him 5 minutes

But noooooooo, he can’t even have a little (semi) harmless fun like that, because his tattletale big sister has to come ruin it. Like… who does she even think she is, the self-appointed Door Monitor/Fun Police? Ugh.

So rude

But hey, since she’s there, maybe he could just play with her instead?

Imma GET YOU
Ok nope nope nope girls is scary

Ok, maybe not. He’s fun but he ain’t dumb. Sisters… just the worst, right? Perhaps he should try somebody less scary bossy instead.

Ollie: HEY REMI! Remi: Oh geez.
Ollie: Let’s play! Remi: uggghhhh nooooo
Ollie: C’mooooooon!!!!
Remi: Ok fine, just a little Bitey Face

Except… give Ollie an inch and he takes a mile. As soon as you relent, it’s on like Donkey Kong. WELCOME TO DA THUNDERDOOOOOME! Remi falls for it every time. He’s sweet, but he’s certainly never going to outwit a tenacious pony. Get’s played like a fiddle every time.

he already has regrets, but it’s too late now
Remi can hold his own though. Size helps.
Ollie: Ok truce! TRUCE!

Here’s the thing though… never trust the pony kid. Ever heard of Napoleon? Those short ones, man… they’re wiley. Ollie’s not playing by your rules. He’s just waiting for you to let your guard down and then WHAM!

SNEAK ATTACK
Remi: Dear God, someone help…
Ollie: *CHOMP* Remi: Ok, that does it…
I’M BIGGER THAN YOU
Remi wins!

Ollie can try to make himself as tall as he wants, but that’s just one battle he’s never going to win. Inevitably the big kid will eventually get the upper hand and shut him down. It just takes Remi longer to get there, since he’s more tolerant than the girls. Never fear, though… they’re still best bros. No hard feelings here. Ollie’s all about the game, not the outcome.

Truce for real. At least for now…

Plus, ya know… give it 20 minutes. Remi will forget and the cycle will repeat itself again.

Rainbow and Glitter

So, while Presto was overall really good on our off-farm adventure on Sunday, there was one little incident that reminded me that he is indeed 3.

omg what dat?

I don’t even remember what he spooked at, but it was over really fast. One propped stride, a stare off into the distance, and we were off again. He has this weird technique when it comes to spooking… it’s like a combination of the thoroughbred “teleport” (where they exit the premises as quickly as possible – Henry’s favorite method) and the warmblood “stop and snort” (where they plant all 4 feet and won’t move). Presto is like 50% stop and snort and 50% teleport that makes for a very… um, athletic combination. That combined with the fact that his shoulders are so narrow makes it reaaaaally easy to become unseated. I stayed on, not a problem, but I did find myself thinking “I really need to order a new neck strap…” in that particular moment.

My last neck strap was a plain brown leather one from Nunn Finer that seems to have grown legs and R-U-N-N-O-F-T. I was waiting for the Black Friday sales to order another, having narrowed it down to either the Clever with Leather padded one or the Super X Country biothane one, but I figured it might be in my best interest to just go ahead and pay a few bucks more to get one sooner. A few things made me lean the way of SXC over CWL – 1) the SXC one is thinner than the CWL one, which I prefer. 2) while generally I would pick leather over biothane in pretty much every instance, a neck strap might be one of the few exceptions. Especially for Presto, who sweats REALLY WELL. 3) more color/customization options. Especially when SXC just came out with a rainbow hardware option. 4) the SXC was a bit cheaper.

gold, silver, rainbow, rose gold, black

Know what dis bitch likes? RAINBOW HARDWARE. I have none of it on anything else I own, but a neck strap can be more fun right? It’s such a small detail. I’m running with it.

I ended up ordering a navy neck strap (with d ring saddle attachment, so it’s super legal no matter what) with rainbow hardware and rainbow lettering that says OH SH!T. Because I’m equal parts adult and child, I guess. Whatever. It’ll amuse me, and that’s all that matters. I’m pretty conservative (for an eventer anyway) with my color options and show turnout, but teeny little touches on a neck strap are kinda like my little secret, and will probably bring me joy every time I put it on. What else can you ask for from a dang neck strap? We’ll see how long it takes to get here from the UK. Why do they have all the best things?

And then in my mad internet scouring, looking for cheap FreeJump stirrups, I finally found what I was looking for in a consignment shop in Arizona that had mostly Western and low-end English gear. A very random find, but there they were, and for about 60% off retail. I swear, I looked at every consignment tack shop in the friggin US and every listing on facebook, and while I did find a few, none of them were very discounted. The listing on this site just had them as “FreeJump stirrups” with no info about which model, and the picture showed some really dirty, sad looking black stirrups. I wish I had saved the original picture, since the listing is gone now. Anyway, from the angle of the photo I couldn’t tell if they were the Lite or the Pro, so I called the shop and asked them to send me a couple more photos.

Wasn’t joking when I said dirty and sad

Anyway, I nabbed them and they’re on their way to me as we speak. I’m pretty sure I’ve got my leathers situation covered thanks to Stacie, so now with both leathers and stirrups I won’t have to worry about switching anything back and forth between Henry and Presto’s saddles. Me forgetting to switch them before hauling somewhere and ending up with no stirrups on my saddle became a recurring nightmare, because it’s 100% something I would do.

I have to admit that black stirrups don’t get me super excited though. Right now I have navy Lorenzini’s on my dressage saddle and navy FreeJumps (which are admittedly a bright navy that is closer to royal IMO, I don’t love the shade) and there’s just nothing exciting about non-colored stirrups anymore. Eventer, remember?

I have a lot of painting experience from past projects, so I’m tempted to give these a go too. Specifically leaning towards either plain dark green or navy glitter. Just a lil’ bit of glitter. Like a tiny bit. Enough to count as glitter but not enough to be like GLITTER, ya know? I can picture it in my head, just go with it. I’m definitely leaning towards that over green (a few people have said to do dark green glitter but… green is already a stretch for me, I’m not sure how I feel about it with glitter) but I’m still waffling a bit. Glitter just sounds more fun though, ya know?