
Okay I swear this is (probably) my last Pivo info/how-to post, but I wanted to put together something a little more comprehensive where the information is all contained in one post. I’m still getting a lot of questions about it, so I’m gonna try my best to answer all the most common ones here and use this one post as reference. If there’s anything I’ve forgotten or didn’t address, let me know and I’ll add it in. As things change over time with the app and the software (as they most definitely will – they already have changed a lot in the last month!) I will come back to this post and make updates. I’ve used the Pivo enough by now to where I feel like I’ve got a good handle on it and how it works, especially now that the newer features have been more established. So some of this is a repeat of things I’ve said about it before, and some of this is newer information, but… bear with me, I’m trying to be thorough. I’ve become pretty obsessed with this little gadget!
What you need to know before you order a Pivo:
- Your success with the Pivo pod will likely depend on your phone. The Pivo app uses software to “see” and track the horse through your phone’s video camera, so if your phone is outdated technology (particularly if the video quality isn’t great or the CPU isn’t very powerful) you won’t have as much success. There is a list of supported smartphones on Pivo’s website here. Currently the app also does seem to work a bit more seamlessly on iphones, which is understandable since it is much easier and faster to develop apps for iPhones than it is for Android. Given time I have no doubt that Pivo will get it working just as seamlessly for Android phones too (they are constantly making improvements and releasing updates), but it could take a bit longer and new features may tend to be buggier at first. Be prepared to be patient.
- Understand how the technology works. Your success with getting the Pivo to work for you also depends greatly on your understanding of what the Pivo is looking for and how it “sees”. There is no tag or tracker that the pod is syncing with in order to follow you, it’s tracking capability is completely software-based. The software uses your phone’s video camera as it’s eyes to see and track the horse. In order to do this, the software is looking for two main things in particular: shape and contrast. There are 3 shooting modes for the Pivo: face, body, and horse… obviously the horse mode was designed for horse tracking, and when it’s in this mode it’s looking for the rectangular shape of a horse to lock onto and follow.
- Certain things that can make it difficult for the Pivo to “see” and track effectively. Just like with the human eye, certain environmental conditions can make it more difficult for the Pivo software to clearly see your horse and get a good lock for effective tracking. If your space has a lot of shadows where you’re going from light to dark, if the sun is behind you causing glare, if your horse is the same color as the background/footing, if you ride too far away from the Pivo to where it can’t discern the horse shape anymore… all of these things are challenging to the human eye, and they’ll be challenging to the Pivo as well. If it would make you squint, the Pivo will likely struggle as well. Think about your riding space and conditions and consider how easy it will be for the Pivo software to see you clearly. If you have a very dusty arena it can cause some issues as well because it “blurs” the video, and if you ride with multiple people in the ring, the Pivo will track whichever horse is easiest for it to “see” and follow at any given time. So, you might end up with video footage of the other people in the ring as well.
- Be realistic with your expectations. Keep in mind, this is relatively new and very complex technology. While it’s constantly involving and improving, right now it does have limits to what it can do. If you expect it to be perfect no matter where you put it or what the lighting is, you will end up disappointed. If you expect it to perform as reliably as the other riding tracking tools on the market that are 8-10x the price, you will end up disappointed. It’s a GREAT tool, especially for the money, but it isn’t perfect and there is a small learning curve in the beginning.
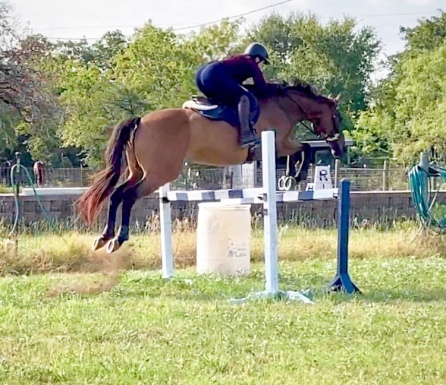
- Deciding on the Red vs Silver. So once you’ve decided you have a good enough phone, it should work for your needs, and you want to take the plunge, the next question is – which Pivo Pod to get? The only difference between the Pivo Red and the Pivo Silver is the speed: the Silver can spin twice as fast. If you will be riding at speed, like faster than a regular canter, or if your riding space is small (thus the Pivo will need to spin more quickly to keep up), or if you want to use it for jumping, definitely get the Silver. My recommendation would be Silver no matter what, just because having more speed capability isn’t going to be a bad thing, even if you don’t really need it, but if you’re only doing groundwork or regular flatwork, the Red would suffice.
- What about accessories? Pivo also offers some accessories to go with your Pivo Pod, and people are often wondering what they really need. This depends on how you want to use your Pivo. First and foremost, I would recommend a tripod no matter what. The more stable and level you can make your Pivo, the better off you will be, and it needs to be horse-height to track well, so a tripod is just going to be necessary. Pivo has one on their website, or you can buy/use any tripod that has a 1/4″ threaded screw tread (a standard camera mount that most tripods come with). Some people like to buy the flexible tripods so they can hook it on a fence, some people have taller horses and might need a taller-than-standard tripod… go with whatever works best for you. As for the other accessories – the Smart Mount is really only necessary if you have a phone case that is thicker than standard and won’t fit in the Pivo’s built-in phone groove. This would be the Otterbox Defender or larger. Basically if your phone is encased in a tank, err on the side of caution and get the Smart Mount. The Action Mount is another attachment, meant for those who want to use an action camera (like a GoPro) in conjunction with Pivo. They also offer a soft pouch case or a hard shell travel case for storage. Keeping the Pivo safe and out of the barn dust/grime is important, so one of those two cases might not be a bad idea. If you’ll be transporting it a lot or are clumsy (ahem, me), maybe the hard shell case would be the better choice.
- Join the Pivo facebook group. Last but not least, before you order definitely join the Pivo Horse Riding Community facebook group and spend some time reading. Pivo runs this group, and people post all kinds of experiences, questions, successes, failures, troubleshooting, you name it. If you take some time to sit back and read through this group and the comments, you will learn A LOT, and you’ll be that much more knowledgeable by the time your Pivo arrives.

Before you use your Pivo for the first time:
- Play with it at home first. Alright, your Pivo has arrived! What now? I would strongly recommend that you take half an hour at home to download the app and play around with it and the Pivo. Get familiar with the app and how to work it, and find where the different settings are and how to change them. Familiarity helps tremendously, especially when you’re standing next to the arena in the sun holding your horse and trying to set it up. You’ll be much less frustrated if you’ve already poked around in the app in advance.
- Learn the different settings. If you’re on this blog reading about the Pivo, I’m going to assume that you’re on a horse and using it to record yourself riding, so those are the settings I’m going to talk about. First and foremost the Smart Tracking needs to be set to AI. This is what will enable the different tracking modes, and from there you can select Horse mode or Beta Horse mode. If you don’t see any horse modes, you probably haven’t selected AI (common mistake). The difference between these two tracking modes is that Horse is the original tracking mode, which can detect a horse from its side profile. For this mode you need to be riding 360 degrees around the Pivo and stay fairly parallel to it so that it can see the horse’s side profile. Beta Horse is the new (still in beta testing, as the name implies, so some users may find some bugs) horse tracking mode that allows the Pivo the recognize the horse from any angle, thus allowing for more reliable tracking and placement outside of the arena. For me, with my iPhone, Beta mode works perfectly no matter where I put it. Your mileage may vary depending on your phone, since this mode is still in testing. Choose whichever tracking mode sounds more suitable for you, or play with both and figure out which one you prefer. To access all the other settings in the app you will drag the screen to the left (or down from the top if you’re in landscape). You can see an explanation of each setting and what they mean on Pivo’s website here, I won’t bother repeating what they’ve already written. My own personal preferred settings are Center, Frenzy, Predictive Follow Off, Tracking Exposure On, Auto Zoom On. I feel like these are a good starting point for most people, but you may have to tweak them a bit depending on your own environment and usage. If you know what they all do, you’ll be better able to judge what you might need to change. Predictive Follow seems to be the most confusing setting to most people: my recommendation would be that if you’re using the Pivo in the center of your arena and riding 360 degrees around it, having it on might help, particularly if you have a Red that sometimes struggles to keep up. Otherwise (or if you’re ever in doubt, because sometimes it seems to cause more problems than it solves) turn it off.
- Figure out if you might need to add contrast to your outfit to help Pivo “see”. As I mentioned above, the Pivo really needs to be able to differentiate the horse from the background in order to track it successfully. So think about your riding area – is it a bit dark? Does your horse blend in with the footing or background? Is the sunlight weak? If so, you might need to add some “pop” either with white shirt/saddle pad/boots or a bright color (Pivo seems to love hi-viz pink, if you’re really struggling to get it to see you). Keep that in mind when choosing what to wear and dress your horse in.
- Check your phone’s video settings. Before you get out there and start recording, check a few things with regards to your phone’s video capability. First, double check what type of video your phone is shooting. For iPhones, you would go to Settings>Camera>Record Video to see this. I would recommend setting this to at least 1080p, for better quality. If you have tons of storage space and want the best video possible, you could change it to 4k. I personally have mine in 1080p at 60fps and think that’s a happy medium to get good quality video/sreenshots without eating up too much storage space. And while we’re talking storage space – make sure your phone has PLENTY. Riding videos are going to be long, and if your phone doesn’t have the space to store it, it won’t save. Clean that thing out, empty your deleted folder, and be mindful of your video file size.
- Decide where you want the videos stored. While you’re playing around in the Pivo app, you can also change the settings for where you want your videos stored. You can have them save to the app’s gallery (for export later), you can have them save to just your phone gallery, or you can save them to both places. If you’re particularly worried about storage space, you could just pick one or the other. If you’re more paranoid about losing videos, you could pick both.
- Make sure your Pivo and phone are charged. Last but not least, before you take your Pivo out to the barn and get ready to use it, make sure everything is well-charged. Pivo recommends one hour of charging time for a completely depleted battery, so when I charge it I always just plan on leaving it on the charger for that long no matter what, just to be sure. I would also strongly suggest that you make sure your phone is as charged as possible. Because of how much the app uses your phone’s CPU, it can eat away pretty quickly at the battery life, particularly if your phone is a little bit older. Mine (with a pretty new iPhone SE 2020), uses about 1% battery for every 2 minutes of filming. Your mileage may vary, you’ll figure it out as you go. You definitely don’t want your phone to die in the middle of a ride though, and you also want to avoid putting your phone in low power mode, because low power mode slows down your phone’s CPU, which will effect the performance of the Pivo.
screenshot courtesy of my Pivo
The maiden voyage:
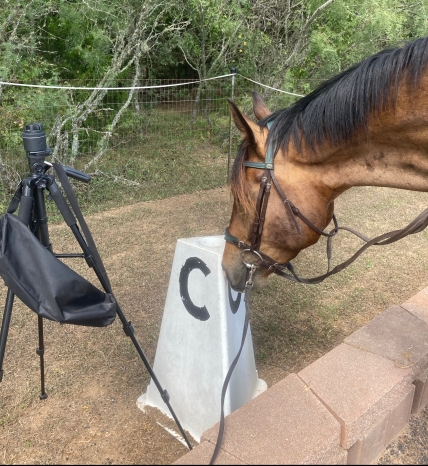
- Choosing the right spot for your Pivo. Alright, we’re finally getting to the fun part – actually using the Pivo! The first decision you have to make is where to place the Pivo (which is hopefully on your tripod) in your riding space. The absolute most foolproof and easiest place is smack dab in the center of the arena (at X in a dressage arena). For a first timer, I would always recommend starting there, at least until you get a good feel for it (this is also the best placement if you’re jumping). My own personal favorite placement for flatwork is outside of E or B, in the middle of the long side of the arena (if you’re not a dressage person, here’s a link to the arena so you can see the letter placement I’m referring to). If you’re going to place it on the side, the most ideal position is a few meters away from side of the arena. You may not be able to do that if you have a fence or a wall – if that’s the case you can place it AT the letter, but be aware that if you ride right next to the Pivo, it will probably lose you (because, remember, it’s looking for the shape of the horse, and when you get super close to it to where the horse more than fills the screen, it can’t find that shape anymore). You also need to pay attention to where the sun is – you don’t want the phone to be looking into the sun. The Pivo is capable of filming from C (works better with the newer, better video quality phones and iPhones right now) if you need it to. It doesn’t really seem to love being placed in a corner, so I would avoid that if you can.
- Make sure it’s level. Now that you’ve picked your spot, set up your Pivo/tripod and make sure it’s level. The Pivo has a built in level, as do most tripods, so it’s pretty easy to see when you’ve got it adjusted correctly. The more level it is, the easier the Pivo will be able to track your horse.
- If it’s windy, weigh down your tripod. Anything that causes your phone to shake will affect the video quality, so if it’s particularly windy it’s a good idea to add a little bit of weight to your tripod for stability. Many tripods have a little hook under the center part for just this reason. I usually just stuff a couple rocks into the tripod’s bag and hang it from that hook, but you can use whatever is easiest to give it some weight.
- Prep your phone. Alright, let’s get this show on the road. If you’re someone that gets a lot of phone calls or notifications that may interrupt your filming, I would suggest turning your phone to airplane mode (but make sure the bluetooth is still on or you won’t be able to connect to the Pivo!). Make sure all of your background apps – anything that could be using your CPU – are completely closed. Also take a second to clean off your phone’s video camera lens (whichever one you’re using) – a stray fingerprint can ruin a whole video.
- Turn on the Pivo. Power up your Pivo pod, open the Pivo app (which you will have already downloaded and played with at home), and connect the app to the Pivo. Once you’re connected you can choose what settings you want to use (again, you should have already familiarized yourself with them and how to change them) and decide whether you want to use the front (selfie) camera or the back camera. The back camera is better quality, but for a Pivo newbie the selfie camera makes it a little easier to check your progress throughout your ride. I started on Selfie and then switched to the back camera once I got more comfortable. Choose whichever you feel best about using. Make sure you are in video mode, not photo mode. Then set your phone into the Pivo in LANDSCAPE MODE. Not portrait. Landscape.
- Get the Pivo locked on to your horse. I am always super obvious about this step by placing my horse directly in front of the Pivo (a few meters away, if the horse can be trusted unattended) to ensure that it locks on. Once the Pivo locks onto the horse you will see a red square on the screen, over the top of the horse.
- How and when to start the video. The Pivo comes with a remote so that you can stop and start the video whenever you want. If you’d rather get on, warm up, and then use the remote to start videoing, you can do that. I personally don’t want to mess around with a remote, plus I like to see the warmup footage too, so I always start mine when I’m standing there behind it, after I’ve locked it on to the horse. When you’re mounted it’s hard to tell whether or not it’s filming, so to me it’s easiest and most foolproof to start it when I’m on the ground and can easily confirm that it is indeed filming (when you start filming, the hour/min/sec counter will appear and start incrementing, just like when you take regular videos on your phone). If you’ve played around with the remote at home and feel comfortable and confident with it, use the remote. If not, start it from the ground.
- Enjoy your ride! Other than sneaking a glance every once in a while to make sure that the phone is still pointed at me, I largely ignore the Pivo while I’m riding. However, if you have it placed right up against the rail or in the middle of your arena, you may have to be more aware of it to avoid getting too close. Likewise, if you’re riding in a very large space, you may need to stay aware of how far away you are so that it doesn’t lose you (once the horse fills less than 10% of the screen when it’s zoomed, the Pivo will struggle to keep sight of you).
- Finishing your ride/saving your video. When you’ve finished riding you will hit the stop button (either on the screen or on the remote) to stop recording. The Pivo will then save your file to wherever you specified – app gallery or phone or both. While it’s saving the file the screen will say “making magic” – do not close the app or turn off Pivo before this is finished. If you do, you risk losing the file. Usually this “making magic” step only lasts for a matter of seconds. Once it’s done, I always quickly pop into the gallery to verify that the video is there, and then I turn the Pivo off and close the app.
(Note: if you’re a more visual learner and would prefer a video to help you with these steps, check out Pivo’s youtube channel, or check out Riding with Rhi’s channel as well.)

Troubleshooting:
- There will be hiccups. Once you get comfortable using your Pivo and learn how it works, it’s pretty simple, but a bit of a learning curve and some rookie mistakes are to be expected. When in doubt, if you’re having issues with the performance, take the time to think about what the Pivo is seeing. Look at your environment and conditions. Check that your settings make sense for your usage and conditions. Don’t be afraid to experiment with different settings or placements to see what works best for you.
- When in doubt, do a reboot. At the end of the day this is software (an app) integrating with hardware (the pod and your phone) so sometimes it just throws itself for a loop and needs a reset. If you’re seeing weird or atypical behavior, try rebooting the pod and your phone.
- The Pivo facebook group is here to help. If you have an issue that you just can’t figure out, or want to learn more, I can’t stress enough how valuable the Pivo facebook group is. Not only is someone from Pivo available to help walk you through it, you have hundreds of experienced Pivo users that can help too. I would have had a much steeper learning curve if not for that group, it’s incredibly helpful.
- Keep up with latest bugs/fixes/new releases. The great thing about the Pivo technology being software based is that it IS rapidly improving and evolving, and you will always have access to the latest and greatest features without having to buy a new Pivo pod. I have to give big props to Pivo for listening so intently to their equestrian customers and working so quickly to improve the app for us. At this point they are constantly releasing fixes and updates and new features, as often as once a week. If your phone isn’t set up to auto-update your apps, it would be a good idea to check in often and make sure there isn’t a new version waiting for you.
- It’s easy to report bugs. If you do come across an issue that can’t be explained, it’s easy to report a bug directly to the Pivo developers via their website. You can include the video to show them exactly what happened, as well as what phone you have, so they can try to fix it. So far they’ve been super responsive about this and they really encourage users to report any bugs they may find.

There is also a relatively new Pivo function called Pivo Meet, which is intended to be used for remote lessons. This is a new release that is still in the beta stages, but something that I also expect to be rapidly improving. It’s definitely not perfect yet, but some people are having success with it (search the Pivo group to read about people’s experiences!). If being able to use the Pivo for remote lessons is important to you, keep an eye on the group for more updates. I haven’t used it yet, so I can’t lend my own personal opinion, but if/when I do I will come back to this space and expand my thoughts. The functionality DOES exist, though.
If you want to check out some of my own Pivo videos, here are a few for reference:
Jumping in the field
Shooting from E in the dressage arena
Shooting from X in the dressage arena
Hopefully this covers it enough to give you a good headstart on using your Pivo or figuring out if it could be a useful tool for you. If you want more details about particular things, you can also try searching Pivo’s help page. Like I said, I’ve been incredibly pleased with mine and impressed with the company and their customer service. If you have any other questions or topics you think I should cover, drop me a comment and I’ll add some updates!

I really want a pivo but I have a grey (white) horse and would mostly want to use in our indoor that has white walls and light sand footing, really worried we wont have enough contrast. I could wear dark clothes and tack but not sure it would be enough? Any insight? I just tried to join the Pivo FB group to ask there in case others have grey horses….
LikeLike
It depends on how good the lighting is. If it’s dark and everything just looks like a blob, it’ll struggle, but if it’s well lit enough to clearly see a horse, you’d be fine.
LikeLike
Thanks! I do have great lighting so should be good. sadly i live where indoors are a necessity 5-6 months of the year…
LikeLike
Hey Amanda, THANK YOU for this in depth information – very helpful! I’ve been wondering about when to put the phone into the Pivo holder because when I turn Pivo on then the app on, it starts rotating before I get the phone in the holder. But when I put the phone in the holder first and then turn it on, I can’t see it in the sun! Also often it rotates so it’s not looking in the right direction…can I rotate it back manually to where it will see the horse with the back camera? Any additional advice would be helpful.
LikeLike
Do you have predictive follow on? If so, turn it off. The pod will rotate and look for a horse when PF is on, whereas if it’s off it will stop and wait for a horse to come into the shot. I park my horse in front of the tripod before I turn anything on, then turn on the Pivo and start the app, then put the phone in the Pivo and double check all my settings/verify that the Pivo is locked on to the horse, then hit start.
LikeLike
Thank you! I keep Predictive Follow off. Will try your suggestions.
LikeLike
I think if you wait to sync your pod until after the phone is in it and your horse is in front of it, it won’t spin, but if not let me know what it does.
LikeLike
Advice on best steps to lock on to your horse mounted or unmounted? All my arena situations do not necessarily have a mounting block close by. I’m wondering if it makes more sense to set up pivo, let it lock on horse, stop it, go mount and come back and start recording (with remote). I have tried but I think it gets lost trying to find us again and there’s the whole not always sure it’s on. Its a bit difficult to fiddle with it on the horse and it doesn’t seem to like it if we leave the area for a couple minutes. I may just need to drag a mounting block down to the arena with me.
LikeLike
my mounting block is down at the end (in the corner by C) and it works just fine to lock it onto the horse when I set it up at E, then go mount. It doesn’t have a problem following my horse that far at least. Honestly in your case I’d just move a mounting block closer just because I’m a lazy person and that’d be waaaay easier than walking as far as you’re saying. LOL. Or you could use the remote.
LikeLike
The biggest thing I’ve learned is that my horse is VERY frequently the same color as our background so Pivo loses me SO quickly. It’s frustrating. I am going to try changing the video quality to see if that helps things. Next test will be at a dressage show! But overall I do like it when it captures me.
LikeLike
Thank you for this as an idiot (as you know) I need a step by step tutorial and this works nicely. Havent bought but thinking very hard about getting one…just think it would be a fun tool to have!! Thanks again! 🙂
LikeLike
This is very well explained. I’ve been using mine for the last week and I just adore it.
LikeLiked by 1 person
also would like to note: don’t forget to turn the pivo OFF when you’re done. it doesnt have an auto off and itll just die and you’ll be sad the next time you go out lol
low power mode will prevent the pivo from spinning, learn from my mistakes!
LikeLike
Good point 😂
LikeLike
My new Pivo sat on counter for a full week – fear! I was directed to your blog, thank you so much!
LikeLike
Thank you for this! A super-useful, well-organised and written guide! Interesting notes about the predictive-follow – I used that (first time yesterday!) thinking it would help….
LikeLike
Thanks for this guide! I’m about to purchase one and I’m sure I’ll be referencing this to trouble shoot. Did you opt to purchase their tripod or a different one? Thoughts on whichever one you chose?
LikeLike
Thanks for this guide! I want to purchase this but only for live lessons with my coach who is in another country. How does it work? with bluetooth?
LikeLike